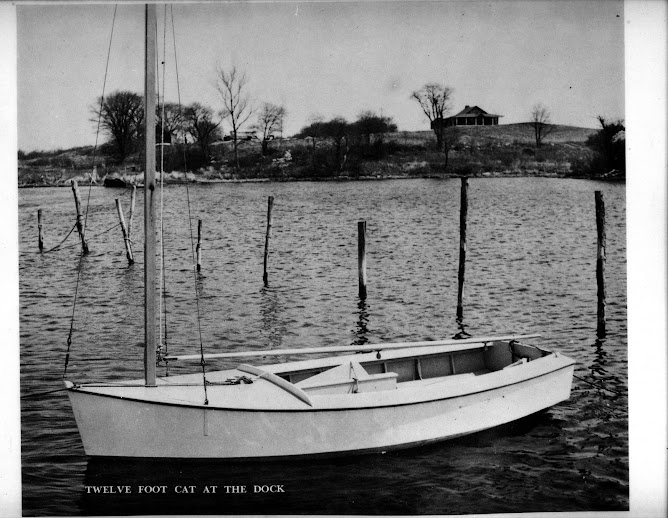
Follow me as I build a 12 foot catboat from plywood and pine. The boat was designed by Edson Schock in the 1940's. This is a project born of a desire to have another boat to sail here in Puerto Rico that will stand-up to the Trade winds. The sail plan will be changed to a gaff rigged sail. All the lumber is locally bought and pine will be substituted for oak, which is not readily available here. Marine plywood will be used.
We got going early on getting the 2nd bottom panel in place and it came out great!
There are a few things that will need to be taken care of like putty over the screw heads and fiber-glassing the seams, sealing and painting the hull. Then we will turn the hull over to finish her off!
Caulked, glued, screwed and nailed one of the bottom panels on the klast day of the year. Terri brushes off the finished product after helping me apply the glue, feeding me screws and nailing the back half of the panel down. This one was a bit easier on the back as there was no bending upside down to nail like we had to do with the sides.
The next step will be to fit the template to the other side and prepare to cut the other panel out.
All in all the installation went great and we can see the day coming that we will be able to turn her over and start working on the top of the boat!
Today, we finished adjusting the pattern for the bottom panel, Things went so well (thanks to Terri's help) that we cut the 1st bottom panel out and made some minor adjustments to make sue it met the keel properly.
There is still a lot to do. Tomorrow, we will begin to lay out where the frames are so we can drill pilot holes for the screws and nails.
The panel sits nicely and is another big accomplishment towards finishing her!
Today we were able to get the other side panel install and it went very quick and smoothly. The frame is real rigid now and we will start working on installing a skeg to the keel.
We got back to work today. We done some smaller tasks in the meanwhile but today we were ready to make a pattern for the side panels.
Marine plywood costs almost $200 for a 12 foot sheet so we bought a $10/sheet panel of Luann plywood, like they use on a door to make sure we got the cutting right.
The pictures show the pattern in place. Tomorrow we will staple a piece at the joint to keep it together then get a sheet of marine plywood on Monday or Tuesday.
Put the 2nd of 4 strips in to the frames to give the entire frame assembly stiffness and have a place to land and anchor the plywood sides and bottom pieces.
The next 2 strips will be about the same but now that I have a "system" for installing them, it should go fairly easy!
Some jobs are not very large but present their own set of unique challenges. The setting of the strips is a difficult job mostly for the complexity of the angles where the strips meets the stem or front of the boat. It took 2 cuts and a bit of fine tuning but I managed to get it fastened into the stem, as well as frames 1 & 2!
Prior to making the centerboard box, I removed 3 frames, #5,6 & 7, to make room to take the keel contour and fabricate the centerboard box. With the CB Box back in place, it was time to cut 4-3/4" from the center of these frames.
I then set each frame back in its place, having had marked their orinal positions on the keel and foundation, starting with #5.
In goes #6
Finally they are all back in. There are 1-1/2 x 3" blocks on top of the keel that I will install next to where each frame meets the CB Box. They will be glued and screwed into the 2 x 6 bedlog then I will glue and crew each frame into them for additional support. There are 6 to install. 2 on each frame. I cut 12 by mistake!
![[image]](https://lh3.googleusercontent.com/blogger_img_proxy/AEn0k_vkPa7giQkhMH_YkgHDmt5LauwgN3g0gmnd9TVyCy-6QIf4EOV3hxuoiHg33N_xDB0XxCxptoeIlyhs8_cAETfagq1PUxVUY8Ee_5J7r-GMFqh4gE7FSFoEX94AkfN6GmZjG2rwOCYkJs6mCBONCQ=s0-d)
![[image]](https://lh3.googleusercontent.com/blogger_img_proxy/AEn0k_vDZQ8JEL-krJuqMWDvfnr6Ayko2-IlkqFoPBO-W3m9I8Do2OfGOTYRp_TcTXlTefahgg49PcMQqtwNrjOk5DVjvV9X1MYZfkjrpPUJrtKS4Zz0O5GfLPaztIiBzBYilBhS--8jGWZtZG0mgCKFcA=s0-d)
![[image]](https://lh3.googleusercontent.com/blogger_img_proxy/AEn0k_sk0qVZpWYdXZ_IL2-pQWAj3SE8XGLnl65ksPWrh5IXX9UXlsiqNunQDiKzgFoe3gxbCXqrd-7diumYzqewKf1EA2EmImgKO5370OilvF194ptJxl1DrEcCjojA4aGHKRL0rMLI94wgkG6sgxJ_pQ=s0-d)
![[image]](https://lh3.googleusercontent.com/blogger_img_proxy/AEn0k_t2FGsFws_-QmnwXvlPUMez7lpaXq4uZZuM4SS6fME4SiRw7HtlsTgM_gs2CmUBgRSVFyNRY0aZfKt-QcN5L-Hr3cTXh7FKuKhj0MzhRPYApCjFkeatuEDDr8f96YKjqb6FBjc1ck4TgnTW0390kQ=s0-d)
![[image]](https://lh3.googleusercontent.com/blogger_img_proxy/AEn0k_vrsElvn1bwdx9z-t3V_8Rayd8WVwE88xFyirYGfn787lVadfExssprpeWjxn0zYg-yCMnWuiv-bWiq88LqTxx4RP9sX-8Q3wKLIBUce5tLbxVPUHCvSvs2CEYLslOWLhHrF24scupfkQYPNS8RhQ=s0-d)
![[image]](https://lh3.googleusercontent.com/blogger_img_proxy/AEn0k_v7ZaQRzpAJlZPpP8sT0zn-hUJ72JSMmvo4n080aZGoKkP0ggrY-X55UPOYZZv_4-dCejbm3MOgPiKDaPRw_gD8iw95AVo3Mg7J7PsSpIYlZcDmXGAs8I5RX6Xyi5-Sl5EF9GhMDn_ez-yGwesLrw=s0-d)
![[image]](https://lh3.googleusercontent.com/blogger_img_proxy/AEn0k_v0OFerMv9OgdEPuMeY2T03XmJxkjUxg_o2RB5rdqmCkhkn4OyNwi0HW3UiOIgrWfYtneIWDICwTvD_-gdX3OSYBi-SwZ9GCjmcET6NfM7BWzmbexlmLrSftOc8K3euLQ-d4oQM1pi4_xhnu08WjFKvuV8=s0-d)
![[image]](https://lh3.googleusercontent.com/blogger_img_proxy/AEn0k_uAO2n6zDyzbsETaicrbZvDW_Ad07MS84L0lr7j8qWEytOQbv4mQXa1rTeT2llY3OizUtodDl8ZmSpndPhlJD29MYHUWGuT4GMBMNTlpAzCmVlQCBN-SjqE_bfF4OIqWi1AudEsVmA-4Oo_VNRe9Q=s0-d)
![[image]](https://lh3.googleusercontent.com/blogger_img_proxy/AEn0k_v8ukn0EBbFHYLYM9wFFnz5immHIbHZN3cqiJhaGTeK6EyNIf6xtZ_61-UTnxhwg7LKvskEKMY2Y0SB_3p-1k2_M1Rws74F54-KPI33_fHeCrsMtgHnKXHW5Grjj8DWuxTCfrsi22izeW73QqzSzDU=s0-d)
![[image]](https://lh3.googleusercontent.com/blogger_img_proxy/AEn0k_vRhdgJ9-94_P3CPyTVg33Qkyfhj993MdYZ2Ct4CU-oBSb_WefMItHtsUBFxdtsTET1AHxStpq3zD-Gayekp_ImzH6sJJVeInj7_12g2tmjGxxMlwMnOsbInhZhLI9Dx-2VlPxrRPKxuJctZgSF-Zk=s0-d)
![[image]](https://lh3.googleusercontent.com/blogger_img_proxy/AEn0k_sHnnn-XoVFjRM4_o2aPapM0WT03z4qgfMbHYCUcq2NUlMewr0w07BpDvrzZ-zDIHGbQVk_3MnI_C9XWKxJWqg5-4xPeEB9_vkF7NCti0U8-oCilbyTCc83UDJpd4ng3Xc1ylUcYzs9cxkhwfT7Ag=s0-d)
![[image]](https://lh3.googleusercontent.com/blogger_img_proxy/AEn0k_v5b_mBQ4wa7nw8rEo9Jb3IaLKpVULYeiGCzjUvgtaxGvOFIlQvCaJb6VS-5Q5Xlzx2U5sbiHqd6kYkR5QmvmOQl9bUzB-lV660lXRtNsO0Yyxrcm5rqPnrNe0dKTvQMlnirZLbDqUtwBytxyxD1w=s0-d)
![[image]](https://lh3.googleusercontent.com/blogger_img_proxy/AEn0k_sItAfY6JsjuJgYWx5Q_VnPY-pfuGjGHcau862_b4-jsxuzlROO6yIcCGW-9KmnzTVX_kZD5p9zKmSQnfCPLYnc2R3ZOgyM5kMmFkVChS7YMT6MWz5jIYIRAxxrw332KZkZE0LSWssIdDUooylwVw=s0-d)
![[image]](https://lh3.googleusercontent.com/blogger_img_proxy/AEn0k_uLJsxm8a9-w6ty2CyVxbXQUIoDyp0o9npDxK9n4WJ4QAXTNnYiJXzNvaRF3Q58X8_-vmG0KgGNFbV-03YJnCJyLFm1rpxozDbMPnrEhS4bwhZlop1BsFIGge3l_WXEwarOU7sLPvKHdqW6BICv=s0-d)
![[image]](https://lh3.googleusercontent.com/blogger_img_proxy/AEn0k_uUj2iXCOcPnUN6V9_c92YMIKadUJW-LoaqTNoE9HYKZP2xZ3cFM9z0d-7Y-PnzMkrZQJhFWtsJS5Rgb9C_7AF4dG2JfIuMraF1mNnrw5ivIE2XW3A3SF3xBW9xdyXglQvvVJ0hGKtvcRqvDvvPgg=s0-d)
![[image]](https://lh3.googleusercontent.com/blogger_img_proxy/AEn0k_tD3HU5ylkfNLvzLlVw2EydlMa5kud5ZP2KFl3lUTS7IzaBxAfwdDPwds93pSXjx4ae-WFptfVyY3eWU1EmQ802PFtxsFLbO2_ibubvVGgRmutv-2Klvo2MUZfHgKDveR5Mqt2ifueTxOkCuBYY4jU=s0-d)
![[image]](https://lh3.googleusercontent.com/blogger_img_proxy/AEn0k_vbz55yjD2EPiLgGam0TcXpE-EQpVGgKfL0zXWyBtYpX-Y9YG62e5tH1FElRxdVYTgF2OtgcLz3_LORRrftYnjtj1NU-xsEMFXMMHrmTM79ksOzsh4pauloWbQuoJjytYULCtxFhrjt-yWRqDNbQPlM=s0-d)
![[image]](https://lh3.googleusercontent.com/blogger_img_proxy/AEn0k_sjmzh0al-_gZiJlJz7-EjjL8rVV5ko6eJFFakq8cX8MkikXW_MVilNJuK_mSvjVOcTNR8ZI5dncZtg12V0VKo66eFV04vjlWRWxiQQy7-s49l4S6bWmCd9oFtc631Kmsa3DVZwlpRMLQwjpnC1KsQ=s0-d)
![[image]](https://lh3.googleusercontent.com/blogger_img_proxy/AEn0k_tkfEzJ1V56lUOq-_9zN1e3AVPFsMPo-OmDUs-9RaZy4psZzJv3KqKVxbWudnjiJJRlY0jrAAT1iInYPhNVFhG3nu-NGA_Btp7ZVDAAVFrADUN2XrSK7yPykgX1W4WhOKCL5QYzYiLxDxB1rfuKqZU=s0-d)
![[image]](https://lh3.googleusercontent.com/blogger_img_proxy/AEn0k_sgK-P3fYCoWzjMdKe5s52UPoQY6I9VjQdYy9c1hXYOWNwiMV7rCNjcPYhu2zxbQrtX03Y0mbVR2r0BYnP1hRUQi2U0d8C2UsaMnPTdzMPsBgkRswTIJCw34CRmaX3i6Y4EYU7cs96QktnX32AsnqSG=s0-d)
![[image]](https://lh3.googleusercontent.com/blogger_img_proxy/AEn0k_u_A4G28gHwdhbvkdsrnQf-NcfgFI7y6OE3U2ahj9sKY3Gb2463Nfi0CcjKAgdwX3qGFOwsO3HFBeScnINY5Tjru133Y_Rg-l6nDIbAkaF9OcVf1U4zWkNmaPDsydEAmy4cLCbogXtOC0q8OkTvbHM=s0-d)
![[image]](https://lh3.googleusercontent.com/blogger_img_proxy/AEn0k_vCoXqB2knPC9WXFIesupSlaqBOxkymVWb1VPvxH_WESDSRlIZhV7-badonKKbEBH-Payg36NKnqgW4SZGzb5dSbDVdeLPJaM1GKnVhDDUMswuEWpKoeoo-QCe_UBl6b58AV4SGcegsXL3hf6yrbxM=s0-d)
