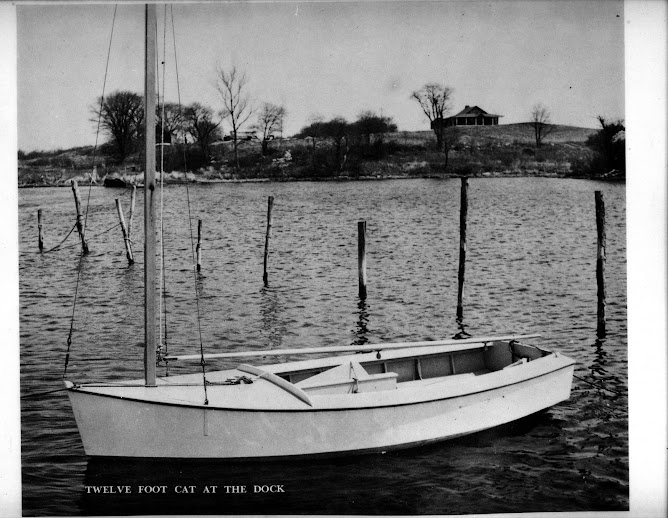
Follow me as I build a 12 foot catboat from plywood and pine. The boat was designed by Edson Schock in the 1940's. This is a project born of a desire to have another boat to sail here in Puerto Rico that will stand-up to the Trade winds. The sail plan will be changed to a gaff rigged sail. All the lumber is locally bought and pine will be substituted for oak, which is not readily available here. Marine plywood will be used.
I began work on the deck beams and have been planing them down to receive the deck and planning ahead a little. There is a lot of details to consider and one thing that I had over looked was to put the mast step in before I put the deck beams in. This is not a problem but I stopped wok on the beams to get it in today. This will receive and hold the bottom of the mast.
Trimmed down the sides, cutting the excess plywood above the shear and the excess frame. Working on the very front of the boat, the bow stem. Trying to decide how high to leave it.
Terri helped me paint the inside and apply 2 coats over the last 2 days. It looks great and is ready for the next step of cutting the excess from the side panels and frame pieces. This will allow me to prepare the sides to receive the deck beams. More on that later. Not sure why the camera gave it 2 different shades but the true color is the bottom pic.
Painted the bottom with copper anti-fouling paint because this boat will be in the water most of the year. Went on well and did not smell as bad as I feared.
Bought some wood to build a cradle to turn her over and 1/2 plywood to fabricate the rudder and centerboard.
Received the 4" fiberglass tape I needed to finished glassing the seams and finished that off quickly. I decided to go ahead and put the sealant on the bare plywood to stop it from cracking and splintering.
I will lay tape out for the waterline and get ready to paint the sides white and put a coat of copper paint on her over the next few days.
We got going early on getting the 2nd bottom panel in place and it came out great!
There are a few things that will need to be taken care of like putty over the screw heads and fiber-glassing the seams, sealing and painting the hull. Then we will turn the hull over to finish her off!
![[image]](https://lh3.googleusercontent.com/blogger_img_proxy/AEn0k_u-0N7yZLYSHmXCz3kuaBP35u8J3lt0BMfHFKgxOS2SWC_qWfHV_7GfBIVqVqZBkMx3C1Sr0BzsLLPZVA59WMiWOCaEh1j8RHS3PqLqt9kzyD7nO_8VH84u8zTe1eUj=s0-d)
![[image]](https://lh3.googleusercontent.com/blogger_img_proxy/AEn0k_uEhZQdtYEzrjzCWXCi7XEYceu7w_WvyOQ6jZLpoSAgsb46FDtcpwA417xMvbN7AfhXD0mDyTWdkThXOIheDboVbekN3ETL-GlWNjuhUPcqHTnR9bsUTqnlS2xOTzQ6ww=s0-d)
![[image]](https://lh3.googleusercontent.com/blogger_img_proxy/AEn0k_uOeGmMZ5bWCnpi9HTleP4LzeAWiWNGOjHozOrSTHaxjHeDYu1wRPPqz-AIk7ph0t30fpqqnSyj0VGOeTBsHn2U-BM2RbPPJ0nWXRvL2oANBn6Yu2FvOXmbJ2B1cHrSLqOQNzcJwIQuCpB-UX2TiQ=s0-d)
![[image]](https://lh3.googleusercontent.com/blogger_img_proxy/AEn0k_tocObq2KS936hubPnEQq-_RvLgtEYmjKKl_j4qsZfUHsvxZJ-CQcubVf9X-xlHHhVuZ-SrXWFRh_JSYFFqWW9LR77Qu8M5nRAFWoPKd_vsywGR3sSy5gskH7QvWr5V0t0CUrTIyGtn4GEF8o5uOQ=s0-d)
![[image]](https://lh3.googleusercontent.com/blogger_img_proxy/AEn0k_s9JRYy33OH_gMDCbgelQFnjTbsOd6EjJeVClJ9zKjYGFmm4oE9IheaZBHLKIxP6cBn1JW5MpGaVSXGT8LtecIid_0MYX4KReGJ7uBbUSTCScxIQLOvHJR8IrCTsb-uzFoq0PppDd0SKOvEk0mr=s0-d)
![[image]](https://lh3.googleusercontent.com/blogger_img_proxy/AEn0k_vrz4LYrSC9ckvSh_-zhhCcVDbrZ5wXiaj1Jyl7ajLN80Rng9w1rMUb2U62X9lRqhveTp6ImBVGg-rSnaIiE2Qol3ODVx-5cLzOUq5RuOUeUIZFILT14Mg9DvtrjQD-1A=s0-d)
![[image]](https://lh3.googleusercontent.com/blogger_img_proxy/AEn0k_tKntja9-SqhMa-Zq8ZIp8fhFcTui7yio95ZVMH2i_AX7cD7T6ZRt7kWFuuM1ZkdSLKOzff-E0DjvS6xgVA3rqiISMttroFBQO9bz7tmp9T2tZFCDGBmPy-BqtP4lSi=s0-d)
![[image]](https://lh3.googleusercontent.com/blogger_img_proxy/AEn0k_tfUYkVG6_ZVopkug4vBhmvCF3vWqtV4f3_BEAIRdtrPjs41IBz9a_CcfjRs_71xFDeqjh6bOJ2CgGSdQ9ILW2lNiwcQ2E8TUzvCQ-5StmUz_uwKrLyBuZ_FFbzIdpp=s0-d)
![[image]](https://lh3.googleusercontent.com/blogger_img_proxy/AEn0k_tUnzJIwutz5d7QK4tRl44fpW0dsl8TCcqbEHj5q3GWM2M0Y7bpillrHdlyZnf9l15rioefV4JH8ngHd_aCKomGGetAf5wz5sLQ8zRjqUJFM2WBK3FvWQbberp7VhDaC9K6e3OjI4CHkmIIXfC0kA=s0-d)
![[image]](https://lh3.googleusercontent.com/blogger_img_proxy/AEn0k_vwlA_RWy_639yuvD1S5hwp1eNETqTPZ_QEpiShQPCbvHhZk4raeaCcqFahu75_dvrB4RoxCCzcTuC5uWhDraiTIUczRJOD3aKn27Zj2JQ-bkUk0iF47PW9I8EkU9WuRlxd3JoDgaMzWQdY8Ui1JQ=s0-d)
![[image]](https://lh3.googleusercontent.com/blogger_img_proxy/AEn0k_vfgjHg6WGlrzDZIDq4EEIuRGR11_-M14wRlwp04SFVpQCD1vVmmGQ6ZhogkgDYmjqF4RGCKOyrIzcCDFPQ-FR6aAf6yFrhZTwDpsZIYbW2sIGsvmt6FkpOCuD1ORf07w7tFCVx7ocblY6O6HU7Dg=s0-d)
![[image]](https://lh3.googleusercontent.com/blogger_img_proxy/AEn0k_vKCjppsDQYNR4N9QcWMxxb9To5gz5gSJ3FXewKQ80t-8HGf5RcHBUFEIgUWRAzwkhIY-UhMmS63N7aIxeMRbTkVrDvrDAvHVuqmtRBhMXNV7safx_1G8j-DCvnzun4DINIt70Ci1upZBrZrtMWTQ=s0-d)
![[image]](https://lh3.googleusercontent.com/blogger_img_proxy/AEn0k_s9Nd6t_qysd378uStwmkCyoPZZZ7oyZI4w4xa1pxvX89mCUaOghXcT3ZQxNuZ457ixl3xih9kG4mgZTcSlHW28MjrV0-mdaSrRJYpC419hMpNWWxxcrE0zO4XurlNtFlb0D5YJnqktcoY6ZLbUEA=s0-d)
![[image]](https://lh3.googleusercontent.com/blogger_img_proxy/AEn0k_sZr1uRAGVcJIVAYjTCpZLxUODTu-0cJTJ9a-v7ZJCOohJ5j_j2Dx_rSqOY90qWBZRwV4kHo_-gYpFeiZB0vAo1arg-eJ1V8vr-Ak2bxkcv4YXSChEcMz_sRda0qoag7AG3AUgsK0vzsKJvziTR8fE=s0-d)
![[image]](https://lh3.googleusercontent.com/blogger_img_proxy/AEn0k_tWCotvQkxz5-otH0g7IZwPbj44LwW9oGjG1X2ZBMLXLzjNot9qhRLIlozsGbq9C0NEWR4qg3kwvtOYa8BSrkBzW4JyPJHPkL8_ewKMWuigK2u9bmjHWkHl_trBpoez79nyD_0ClxgEStMZsm477FaL=s0-d)
![[image]](https://lh3.googleusercontent.com/blogger_img_proxy/AEn0k_uRcUB6bp9MvNRNQEP10AWkEuCnG7Ao3h3yTXJjJq5ZLf-dNuf2yVkiWGhWAarNJYVH_BwSTjIF1JxpvO06LmuPAFaPL65HUvEYpYbEeFrMXRFwq8QdR3cXJq1wHrZWEB4YD9qP7q4U5WHTN8fWDHgx5A=s0-d)
![[image]](https://lh3.googleusercontent.com/blogger_img_proxy/AEn0k_sn4gxUE2_lKRIdEQOjYE-YTKgOv1BUffik1RQywKTYSRBYb3Y3PllRk6fxTXl2iNL3mYzgllAcsfE-dGd8mnyX1LMPpGXbb5wCzslXtexXBh6qSKvYoQMowPLN-J_kQOmA5CIcv-i7gA=s0-d)
![[image]](https://lh3.googleusercontent.com/blogger_img_proxy/AEn0k_sJKaruhHOVyoUPG7_FUDwKavPZ1ne3GESptiG8z6FR8vSi4ruY1v2AEM91il6wr7km8Ox2xKZvE3nh0-s0S0DsBjCu4pppFy_uU1WiyDFVPgcm6KlgUhGTkt9NPWmzlBDGmbQe1RYAFPYpGDnLOA=s0-d)
![[image]](https://lh3.googleusercontent.com/blogger_img_proxy/AEn0k_tTwJNYoNMLtX_6tHlviiTmYNLVYUXPczH4IQVtfNzFNoInyv5OiCp4jW3KuU6iIWfYLaE9Pk8_n_TibOF7jLPMn6g9TqUWJUwk3qBAYHBa2CqIDfkzPkth0Im89hJYMggXkcqU1-92Ov70130Fhg=s0-d)